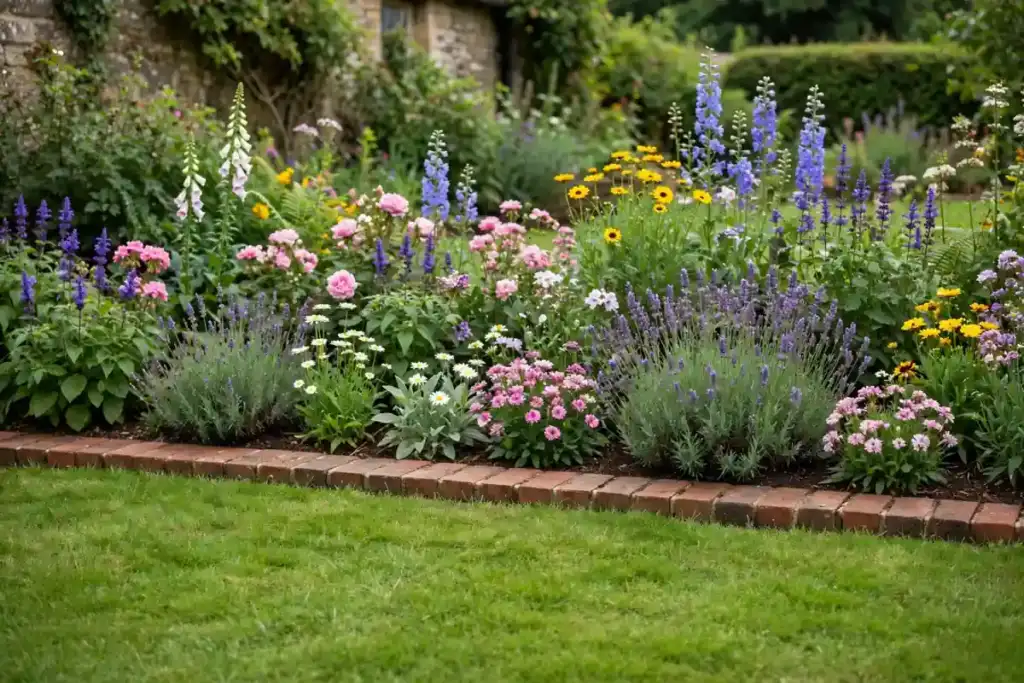
There is a small detail that separates a garden that looks cared for from one that merely looks planted, and it is not the flowers. It is the line where the lawn ends and the border begins. When that line is crisp, the whole garden suddenly looks intentional: the beds read as designed, the lawn looks freshly cut even a few days after mowing, and weeds have one less open door to creep through. Garden edging is that line, made permanent, and it is one of the cheapest, highest-impact upgrades a UK gardener can make.
This guide covers the garden edging ideas that actually work in British gardens, from classic brick and natural stone to slim steel strips and budget-friendly plastic. You will learn how to choose between them, what each one costs in effort as well as money, and how to install edging yourself so it stays straight, stays put, and still looks good after a few winters. Whether your garden is a neat modern plot, a cottage-style tangle of roses and lavender, or a family lawn that takes a daily battering, there is an edging here that fits.
Why Garden Edging Is Worth the Effort
Edging does four jobs at once. First, it draws a clean boundary between lawn and flower beds, so mulch, soil and bark stay where you put them instead of washing or being kicked onto the grass. Second, it slows grass from creeping sideways into beds, which is the single most common reason borders look ragged by midsummer. Third, it gives you a mowing strip or a clear cutting line, so trimming the lawn edge takes minutes rather than a fiddly strimming session. And fourth, it simply looks finished: even a modest border gains structure the moment it has a defined edge.
It also protects your plants. Without an edge, every mow risks scalping the outer leaves of border plants, and every heavy rain carries soil off a raised bed onto the lawn. A low, well-set edge holds the bed together and keeps the mower at a polite distance. If you have ever re-cut a lawn edge with a half-moon edger every spring and watched it blur again by July, a physical edge is the upgrade that ends that annual ritual.
Before You Choose: Four Questions to Answer
The best garden edging is not the prettiest one in a catalogue photo; it is the one that suits your garden’s shape, soil and lifestyle. Answer these four questions first and the choice almost makes itself.
1. Is your border straight, curved, or a mix?
Rigid materials such as brick, stone and concrete kerbs love straight lines and gentle, generous curves, but they fight tight bends. Flexible steel, aluminium and plastic strip edging bend happily around wavy borders and circular beds. If your garden is all sweeping curves, start your shortlist with flexible options.
2. Do you mow right up to the edge?
If so, you want a flush edge or a mowing strip: a flat band of brick, stone or steel set level with the lawn so the mower wheels can roll straight over it. A raised lip looks smart but forces you to strim the edge separately, which adds a job to every mow.
3. What is your soil like?
Heavy clay soil, common across much of England, swells and shrinks with wet and dry weather and can push shallow edging out of line. On clay, bury edging deeper, use a compacted crushed gravel base, and favour steel or stone over thin plastic, which is the first to pop out after a frosty winter. On free-draining sandy soil, most materials behave well, but a gravel base still pays for itself in stability.
4. How permanent should it be?
A rented garden or a border you may redesign next year calls for something easy to lift, such as log roll or plastic strip. A garden you plan to keep for a decade justifies brick or steel, which can last twenty-five to fifty years with almost no attention. Match the lifespan to your plans and you will not pay twice.
10 Garden Edging Ideas, Compared Honestly
1. Brick edging: the classic that never dates
Brick edging suits cottage gardens and traditional plots beautifully, and it is forgiving for a first-time DIYer. Bricks can be laid flat for a subtle, mower-friendly strip, set on end as a soldier course for a taller, more formal line, or angled in a sawtooth pattern for a decorative touch. Reclaimed bricks are especially popular because their weathered colour makes a new border look established within weeks, and they are often free from reclaim yards or local giveaway groups. Expect brick to last decades; its only real weakness is frost damage to soft, low-quality bricks, so choose dense, frost-resistant bricks for exposed spots.
2. Natural stone edging: texture and permanence
Stone edging, whether rough-cut rock, sandstone blocks or slim slate pieces, brings a texture no manufactured product can copy. It blends with planting in a way that feels organic rather than imposed, which is why it works so well in informal and wildlife-friendly gardens. Stone is heavy, so installation is slower and the trench must be properly prepared, but the payoff is an edge that can outlast the gardener. Set stones on a gravel base, level each piece individually, and backfill firmly so frost cannot rock them loose.
3. Steel edging: the modern professional’s choice
If you have admired the razor-sharp lawn lines in show gardens, you have almost certainly admired steel edging. Slim strips of galvanised or powder-coated steel, sunk so only a few centimetres show, give a crisp, almost invisible line that suits modern and minimalist gardens perfectly. Steel flexes around gentle curves, resists rust for decades, and needs no maintenance beyond an occasional wipe. Corten steel, which develops a rich rust-orange patina, is the statement version for contemporary design. Installation is straightforward: cut a narrow trench, push the strip in, and stake it every 60 centimetres so it cannot wander.
4. Aluminium edging: steel’s lighter cousin
Aluminium edging offers much of steel’s clean look with less weight and no rust risk at all, which makes it a good pick for damp gardens and coastal plots. It is slightly less rigid than steel, so stake it well and avoid it where heavy mower wheels or foot traffic will press directly against it. For most domestic borders, though, it is an excellent, long-lived compromise.
5. Timber edging and log roll: warm and easy
Timber edging, from chunky sleepers to the familiar log roll of half-round stakes linked by wire, brings warmth that suits cottage gardens, vegetable plots and raised beds. It is easy to cut, easy to fix with screws or stakes, and cheap to replace in sections. Use pressure-treated timber and keep it off permanently wet ground where possible; even treated wood typically lasts ten to fifteen years rather than a lifetime. Timber is also the kindest choice for a raised bed edge, where it doubles as a low retaining wall for soil.
6. Plastic edging: the budget, bendy option
Modern plastic edging has improved a great deal: UV-stable strips are flexible, light, and ideal for beds that snake around patios, ponds and trees. Installation is the simplest of all, usually just a shallow trench and pegs or metal pins. Be honest about its limits, though. Thin, non-UV-stable plastic goes brittle in sunlight and can pop out of the ground within a few years, so buy a reputable UV-stabilised product and bury it deep enough that only the top lip shows. For a quick, cheap tidy-up, it is hard to beat.
7. Concrete kerbs and pavers: the workhorse
Precast concrete kerbs and edging pavers are the choice when you want a straight, durable, low-fuss edge for a driveway border, a path or a front garden. They are heavier than plastic and need a proper base, but they shrug off frost, mower wheels and foot traffic. Their look is functional rather than romantic, so they suit modern front gardens and paths better than a cottage flower border.
8. Rubber edging: soft, safe and recycled
Made largely from recycled tyres, rubber edging is flexible, soft underfoot and needs no digging at all in some designs, which makes it a sensible pick for family gardens, play areas and anywhere children or dogs run. It will not give you the knife-sharp line of steel, and its look is plain, but for safety and speed it earns its place, especially around trees where digging could damage roots.
9. Living edging: plants as the border
For a softer alternative, let plants do the edging. Low-growing lavender, box hedging, thyme and compact geraniums create a fragrant, living line that changes with the seasons. Living edging needs regular trimming to stay neat and will not stop grass creeping the way a buried barrier does, so it works best combined with a simple spade-cut edge or a discreet buried strip. Used that way, it gives you the best of both worlds: structure underneath, softness on top.
10. The no-material edge: a spade-cut line
Sometimes the best garden edging costs nothing. A spade-cut edge, made with a half-moon edger cutting vertically 15 to 20 centimetres into the turf, gives a beautifully sharp line with zero materials. The catch is maintenance: refresh it once or twice a year or grass will creep back across it. If you enjoy that spring ritual, or you are deciding where a permanent edge should go, start here and upgrade later with confidence about the line.
Garden Edging Materials at a Glance
Use this comparison to narrow your choice before you buy. Prices vary by supplier and region, so treat the cost column as a relative guide rather than a quote.
| Material | Cost | Lifespan | DIY difficulty | Best for |
|---|---|---|---|---|
| Steel | Mid to high | 25+ years | Easy to moderate | Modern gardens, sharp lines |
| Brick | Mid | 30+ years | Moderate | Cottage and traditional gardens |
| Natural stone | Mid to high | 50+ years | Harder | Informal, permanent borders |
| Timber / log roll | Low to mid | 10–15 years | Easy | Raised beds, rustic borders |
| Plastic (UV-stable) | Low | 10–20 years | Easy | Curves, budget projects |
| Concrete kerbs | Mid | 30+ years | Moderate | Paths, driveways, front gardens |
| Rubber | Low to mid | 10+ years | Easy | Family gardens, play areas |
How to Install Garden Edging: A Step-by-Step DIY Guide
Whatever material you choose, the same six steps decide whether your edging stays put or starts wandering by spring. The most common failure is not the material at all: it is an edge buried too shallow, on an unprepared base, with stakes too far apart.
Step 1: Mark the line
Lay a garden hose or rope along the border to test the shape, then step back and look at it from the house and from the far end of the garden. Curves should be smooth and generous, not wobbly. Once you are happy, mark the line with spray paint, chalk, or a shallow spade cut. For straight runs, stretch a string line between two stakes.
Step 2: Dig the trench
Dig a trench at least 15 centimetres deep and wide enough for your edging plus a little working room. As a rule, bury a third to a half of the edging’s height: that depth is what stops grass roots creeping underneath, since most creeping grass roots travel in the top 10 centimetres of soil. On clay soil, go a little deeper rather than a little shallower.
Step 3: Lay a gravel base
Spread at least 5 centimetres of compacted crushed gravel (10mm or 20mm) along the trench and tamp it firm. This base drains water away from the edging, resists frost heave, and gives you a level surface to build on. Skipping the base is the shortcut most likely to cost you a re-do.
Step 4: Set the edging and level it
Place your edging on the base, checking height with a spirit level as you go. For brick and stone, level each piece individually and tap it into place with a rubber mallet. For steel and plastic strips, push the strip into the trench and stake it every 60 centimetres at most, even if the kit suggests wider spacing. If you are edging a path or patio, install the edging after the sub-base but before the surface material, so the finished surface locks the edge in from one side.
Step 5: Backfill firmly
Backfill both sides of the edging, packing soil or decorative gravel tightly against it to remove air pockets. Loose backfill is a second common failure: the edge looks fine on day one and leans by the first heavy rain. Water the backfill lightly to help it settle, then top up any dips.
Step 6: Finish and mulch
Finish the bed side with bark mulch or gravel, which further discourages weeds and makes the edge read even cleaner. Lay a weed membrane under decorative aggregates so stones do not sink into the soil over time. Finally, mow the lawn edge once and admire the line: that first clean cut is the moment the whole job pays off.
Common Garden Edging Mistakes to Avoid
The first mistake is setting edging too high. A tall lip looks dramatic in photos but catches mower wheels, trips feet, and collects soil against it. In most borders, 2 to 5 centimetres above the lawn is plenty, and a flush mowing strip is better still. The second mistake is leaving gaps between bricks or stones, which invite weeds and grass to cross exactly where you least want them; butt pieces tightly together. The third is forgetting drainage: edging that dams water across a slope will leave a soggy strip on one side, so leave small drainage gaps or a gravel channel where water naturally runs. And the fourth is choosing a material for looks alone on a tight curve or a clay soil that will fight it; let the garden’s shape and soil have a vote.
Edging for Specific Gardens
For a stunning garden border full of perennials, brick or stone gives the planting the frame it deserves, while a discreet steel strip keeps the focus on the flowers rather than the edge itself. In a vegetable garden or a plot you rework every year, timber sleepers and log roll are practical because you can lift and move them. Around a gravel path, a brick soldier course or a flat steel strip sunk flush on the lawn side keeps gravel out of the grass while letting the mower pass. And if you are also planning seasonal work, pair edging with the jobs in our winterize garden guide so borders go into winter tidy and come out of it intact.
Small gardens benefit most of all from a clean edge, because there is nowhere for mess to hide. A slim steel or flush brick line makes a tiny plot feel larger by separating its zones clearly, whereas a chunky raised edge can eat precious space. If your garden is small, choose the slimmest edge that does the job and let the planting provide the colour.
Maintaining Your Edging Through the Year
Good edging is low maintenance, not no maintenance. Each spring, walk the line after the last frosts and re-seat anything frost has lifted, tapping it back with a rubber mallet and topping up backfill. Clear soil and mulch that have built up against the lawn side, or grass will simply grow over your edge. Trim living edging such as lavender and box after flowering to keep its shape. For timber, check for rot at ground level every couple of years and replace single sections before the whole run fails. Steel, stone and brick need little more than a brush-down and the occasional weed pulled from a joint. For broader seasonal border care, our expert tips for a gorgeous garden cover the jobs that keep the whole plot, edge included, looking its best.
Frequently Asked Questions About Garden Edging
What is the cheapest way to edge a garden?
The cheapest garden edging is no material at all: a spade-cut edge with a half-moon edger costs nothing but labour, refreshed once or twice a year. If you want a material edge on a budget, reclaimed bricks and stone from reclaim yards are often very cheap or free, and UV-stable plastic strip is the cheapest new product that still lasts.
How deep should garden edging be buried?
Bury at least a third to a half of the edging’s height, with a trench at least 15 centimetres deep and a 5-centimetre compacted gravel base. The barrier needs to reach at least 10 centimetres below the surface to block creeping grass roots, which travel sideways in the topsoil.
What is the best edging for a lawn border in the UK?
For most UK gardens, steel edging gives the sharpest, longest-lasting lawn border, while brick is the best traditional choice and a flush mowing strip of either material makes mowing easiest. On heavy clay soil, steel or stone on a gravel base outperforms thin plastic, which frost and clay movement tend to push out of line.
Can I install garden edging myself?
Yes, most garden edging is a genuine weekend DIY project. Plastic, timber, log roll and steel strip edging need only a spade, a mallet, a spirit level and a string line. Brick and stone take longer because each piece must be levelled individually, but they are still well within a careful beginner’s reach on a small border.
Does garden edging stop grass growing into flower beds?
A properly buried edge greatly reduces grass creeping into beds, because it blocks the sideways roots in the top 10 centimetres of soil. No edge is completely grass-proof: a few runners will still cross at joints or over a low lip, but pulling a handful of runners is far easier than re-cutting a ragged border every month.